How To Craft In Minecraft: Essential Recipes for Beginners
Posted by Fen | 21 October 2025
Crafting is one of the most important aspects of Minecraft; without it, you'll have a tough time surviving the night. If you're a new player wondering how to craft in Minecraft, don't worry, it's simpler than it looks.
In a world where you can punch trees to get wood and turn those logs into tools and shelters, crafting is the key to survival. This guide will walk you through the essential crafting recipes every beginner (and even intermediate player) should know, covering basic tools, weapons, armour, and useful utility blocks.
The Crafting Basics: Getting Started
Before diving into specific recipes, you need to understand the crafting system. When you first start, you have a 2x2 crafting grid in your inventory, which is only big enough for straightforward items. For example, you can place a single wood log there to get wooden planks (each log gives 4 Wooden Planks). Planks are one of the most important materials; almost every wood-based recipe uses planks first.
Using the 2x2 grid, you can also make sticks by stacking two planks vertically. This yields 4 sticks, and sticks are used in many crafting recipes as handles or poles. To unlock the full potential of crafting, you’ll need to make a Crafting Table. Use four wooden planks in a 2x2 arrangement to craft a Crafting Table.
Place the Crafting Table in the world and right-click it (or tap it, on mobile) to access a 3x3 crafting grid. This larger grid is what you’ll use to craft tools, weapons, armour, and most other complex items.
Essentially, the Crafting Table is your workbench for everything important. Make one early, and carry it with you so you can craft on the go.
Essential Tools for Survival
Your first order of business in a new world is usually crafting tools. Tools help you gather materials faster and access important resources. Here are the must-have tools and how to craft them:
Wooden Pickaxe
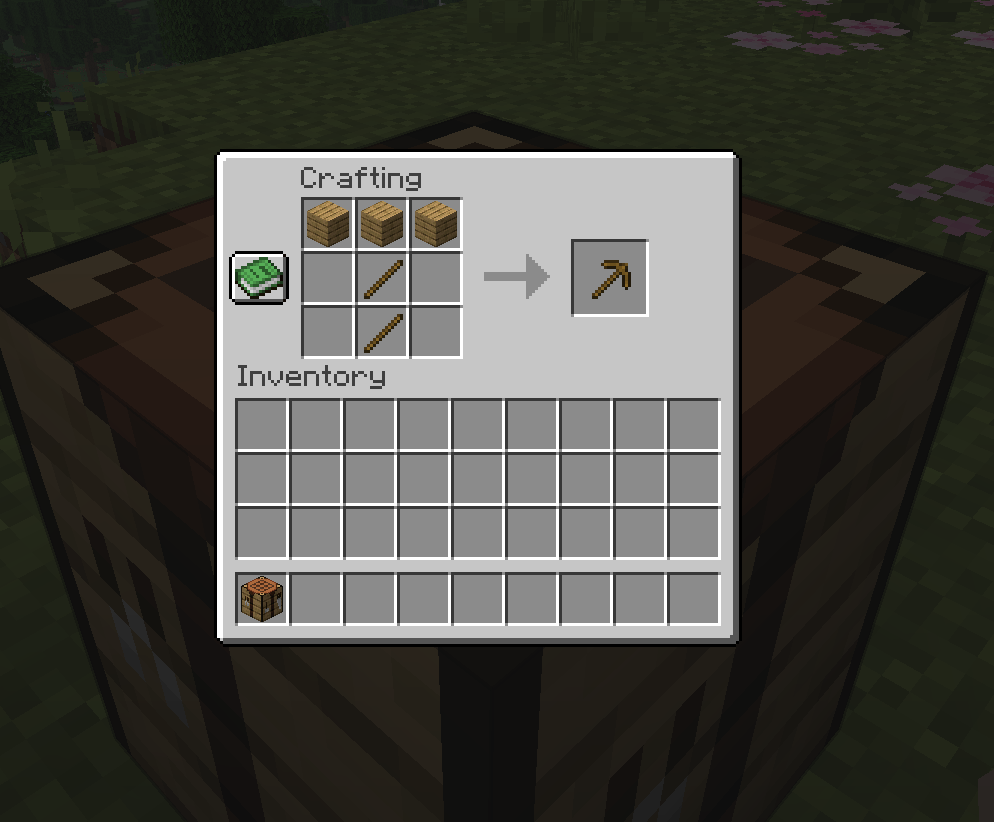
This is typically your first tool. In the 3x3 grid, arrange 3 wooden planks across the top row, and 2 sticks down the middle column (one in the centre, one in the bottom), it forms a "T" shape. This recipe yields a wooden pickaxe, which you can use to mine stone and ores. (The same pattern works for stone, iron, etc., once you have those materials, just swap in cobblestone or ingots for the planks to upgrade.)
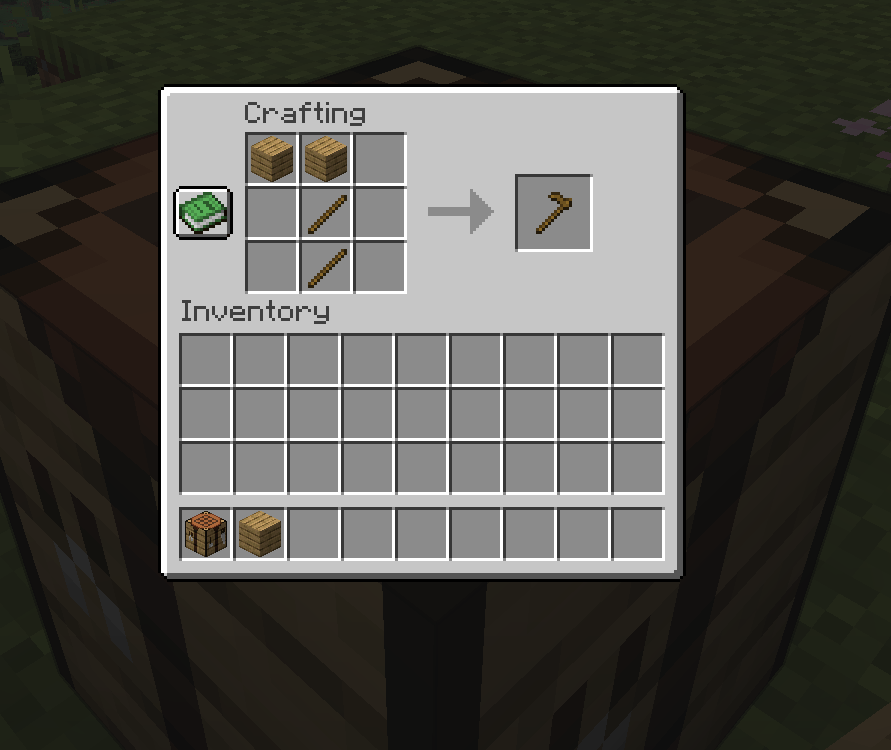
Wooden Axe

To chop wood faster than using your fists, craft an axe. Place 3 wooden planks in an L shape: two planks across the top row (top-left and top-centre), and one plank directly below the top-left plank (middle-left). Then put 1 stick in the centre and 1 stick in the bottom-middle as the handle. The arrangement vaguely looks like a sideways axe. A wooden axe lets you gather wood more efficiently.
Wooden Shovel
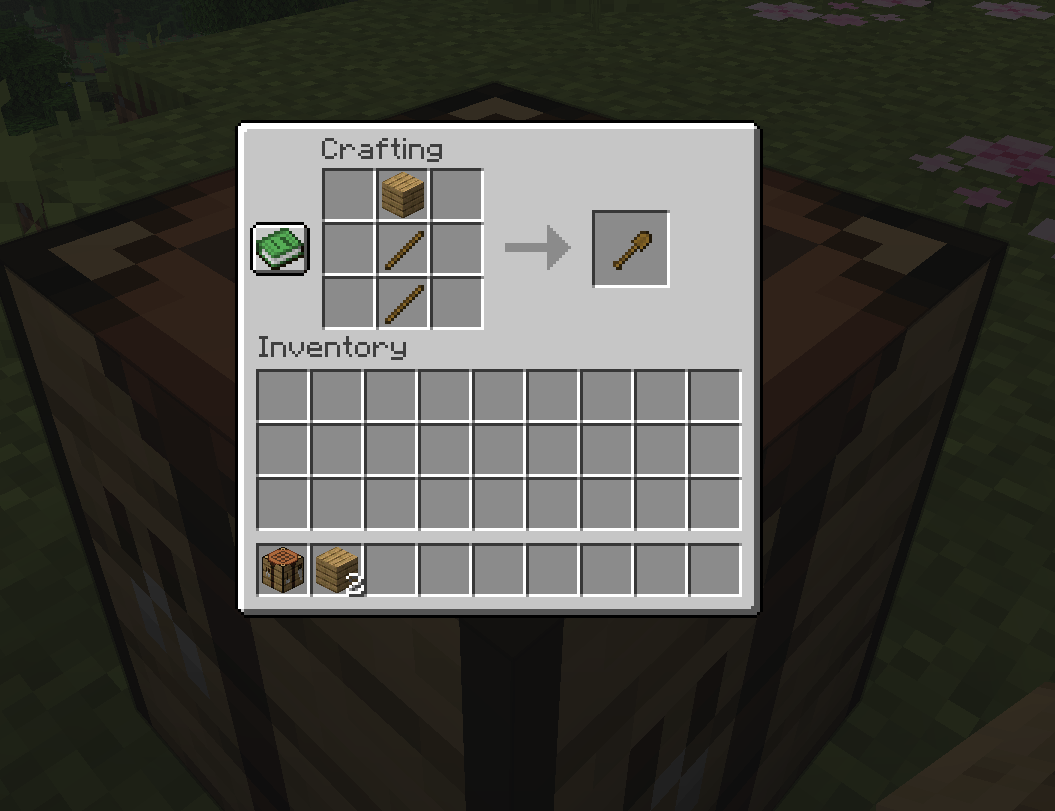
Great for digging dirt, sand, and gravel. The shovel recipe is simple: 1 plank at the top-centre of the grid, with a stick in the centre below it, and another stick below that (so it forms a vertical line). Shovels make quick work of clearing terrain or collecting snow.
Wooden Hoe
If you plan to farm, you’ll need a hoe to till the soil. To craft a hoe, place 2 planks along the top row (top-left and top-centre) and then 2 sticks in a column down the middle below them. This looks a bit like a small "T". With a hoe, you can prepare farmland for planting crops.
These basic tools will get you started gathering all sorts of blocks. Keep in mind that tools (and weapons) have limited durability and will wear out with use. A wooden tool, for example, is quite fragile and will break after a certain number of uses.
Always have some extra materials on hand to craft replacements or upgrade to stone as soon as possible. The good news is that crafting upgraded tools is easy: the recipe shape remains the same, you just use a better material. For instance, to make a stone pickaxe, use 3 cobblestone instead of planks (plus the 2 sticks) in the pickaxe recipe. Also, upgrading to stone or iron tools will greatly improve their effectiveness.
Weapons and Combat Gear
When the sun goes down in Minecraft, monsters come out, so it’s wise to craft some weapons for protection. Here are the essential weapons (and a piece of defensive gear) you should know:
Sword
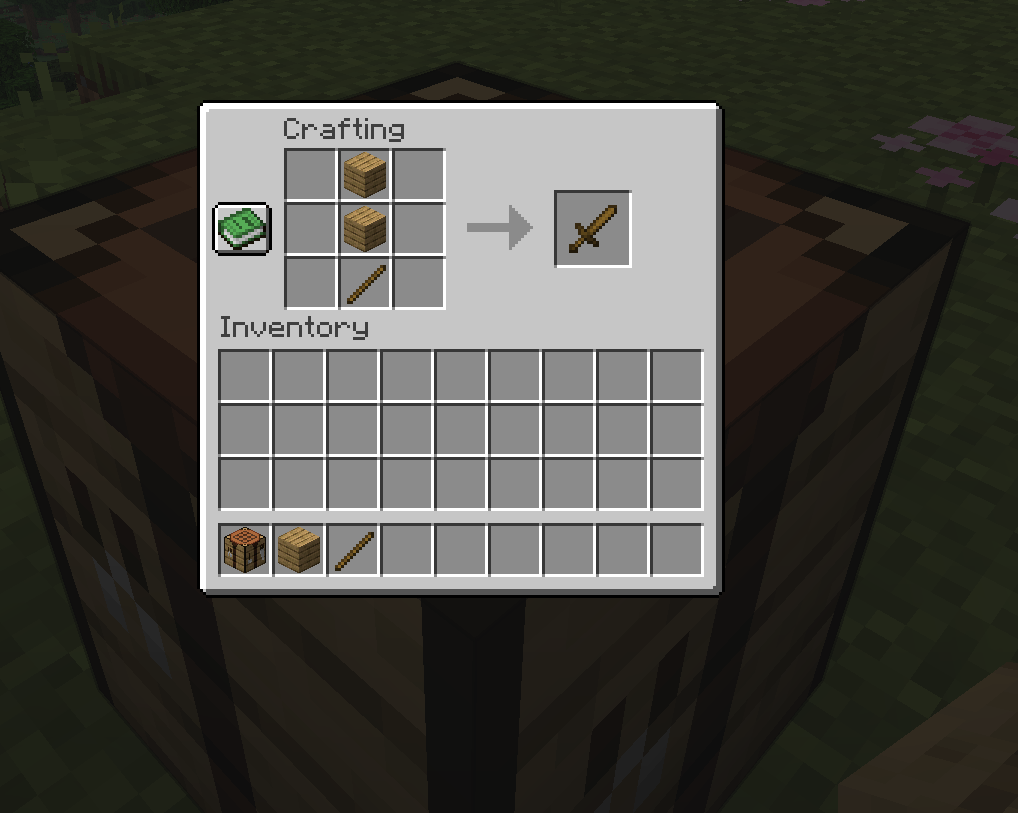
The sword is a basic melee weapon for close combat. To craft a wooden sword, place 1 plank in the top-centre of the crafting grid, another plank directly below it in the middle-centre, and 1 stick in the bottom-centre. This arrangement creates a sword shape (a blade with a handle). You can use higher materials (stone, iron, etc.) for stronger swords using the same recipe (just like tools). Swords deal more damage than bare hands or tools, and are useful for fighting zombies, spiders, and other mobs.
Bow
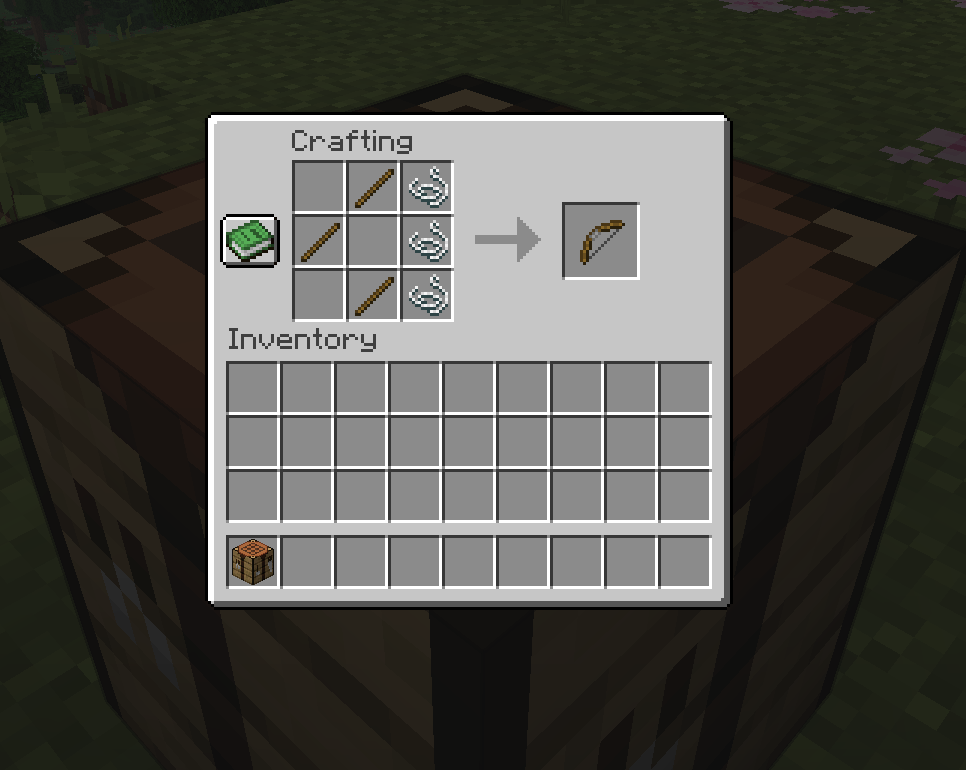
A bow allows you to attack enemies from a distance (very useful against creepers or skeletons!). The bow recipe requires 3 sticks and 3 pieces of string. On your crafting table, arrange the 3 sticks in a curved diagonal shape (imagine the shape of a bow): one stick in the top-right, one in the centre, one in the bottom-right.
Then place 3 strings in a column on the left side of the grid (filling top-left, middle-left, and bottom-left slots). This 3×3 pattern crafts a bow. Keep in mind you'll need to obtain string by killing spiders or cobwebs. String is the trickiest component early on.
Arrows
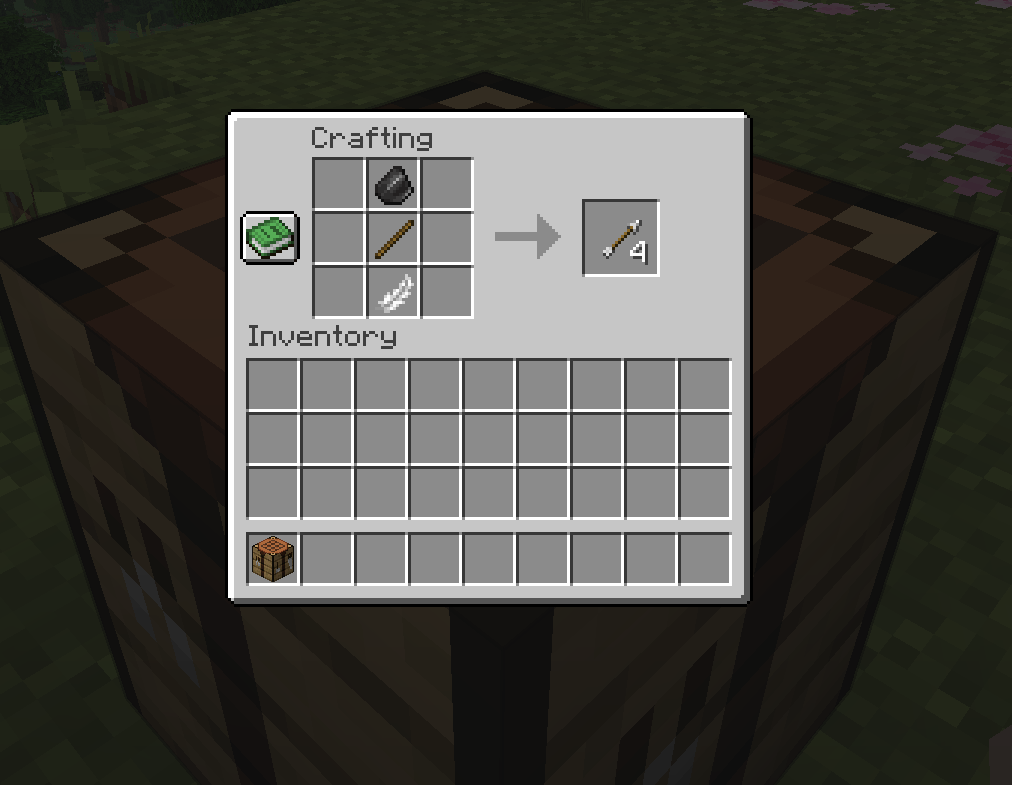
Bows are only effective if you have arrows. The crafting recipe for arrows is thankfully simple (though you might need to gather the ingredients): for each arrow, you need 1 Flint, 1 stick, and 1 Feather. In the 3x3 grid, place them in a column: flint at the top, stick in the middle, feather at the bottom.
This combination gives you a set of 4 arrows. Flint comes from mining gravel (gravel blocks occasionally drop flint), and feathers come from chickens. Once you have a bow and a stack of arrows, you'll be much better armed for nighttime adventures.
Shield
Newer to Minecraft (and a lifesaver in combat), the shield is an off-hand item that lets you block attacks from mobs and even negate arrow strikes. To craft a shield, you need 6 wooden planks and 1 iron ingot. In the crafting table, arrange the planks in a Y shape (fill the top-middle, top-left, top-right, middle-left, middle-right, and bottom-middle with planks), and put 1 iron ingot in the top-centre slot of the grid.
Crafting this will give you a shield. Equip the shield in your off-hand slot (left hand) and right-click (or crouch, on some consoles) to raise it, blocking incoming damage. Shields are extremely useful for surviving creeper blasts or skeleton arrows, so it's worth making one once you have a bit of iron.
Crafting Your First Armour Set
Iron armour is highly recommended for beginners due to iron’s abundance and durability, second only to diamond armour. Here’s how to craft each piece:
Helmet
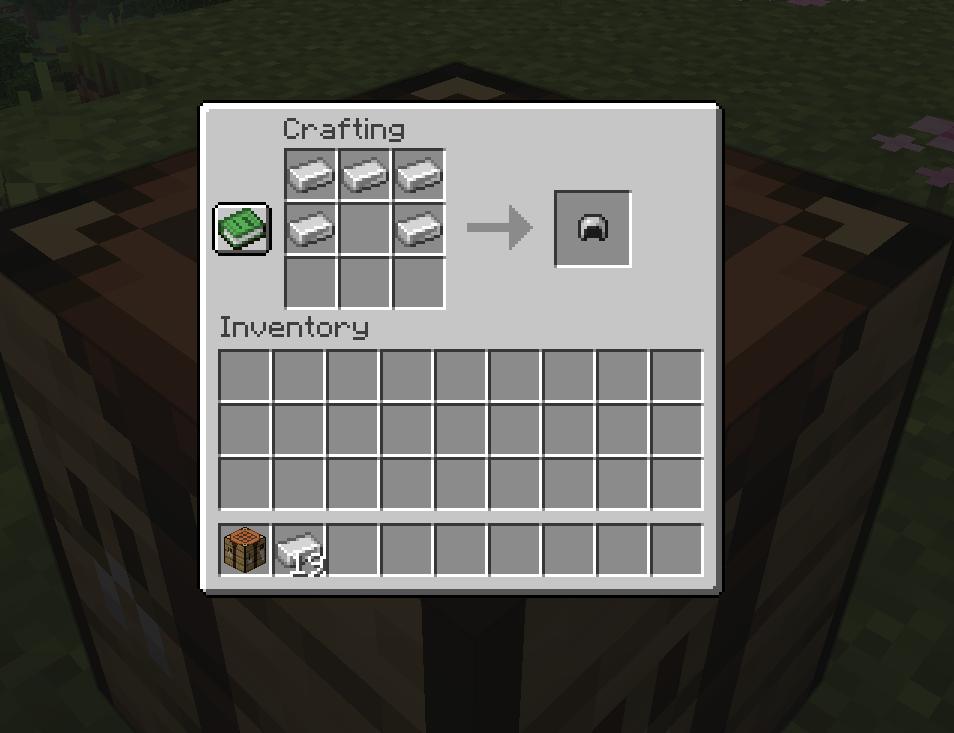
Arrange your material in a U-shaped pattern on the crafting table. Fill the top row of the 3x3 grid, leaving the middle slot empty. Then, place one additional unit in the left-centre slot and one in the right-centre slot. This gives you a helmet.
Chestplate
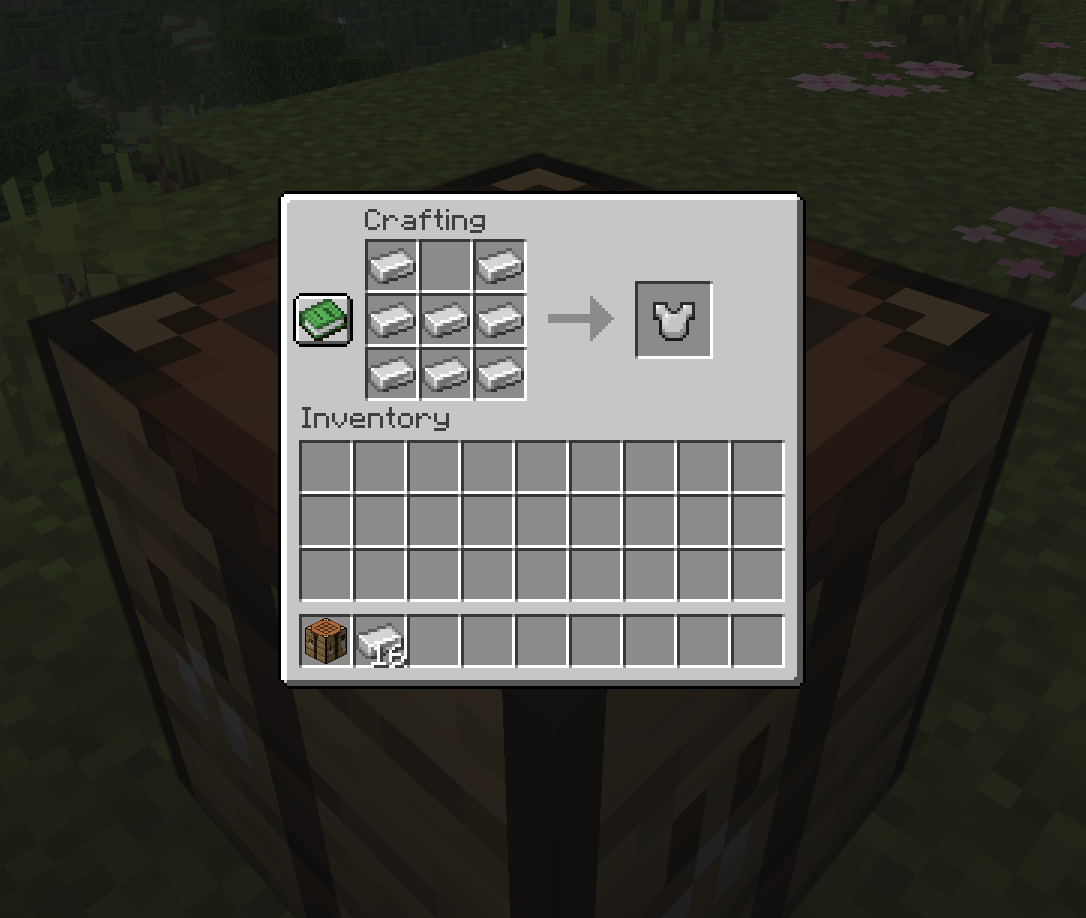
Fill all slots in the crafting grid except for the top-middle slot. Place your materials in the entire bottom row, the entire middle row, and both corners of the top row (left and right). This pattern produces the chest plate, the most protective armour piece.
Leggings

Craft leggings by creating an upside-down U shape. Fill the entire left and right columns of the crafting grid. Then add one unit in the top-centre slot. The centre and bottom-centre slots remain empty. This recipe provides leggings.
Boots
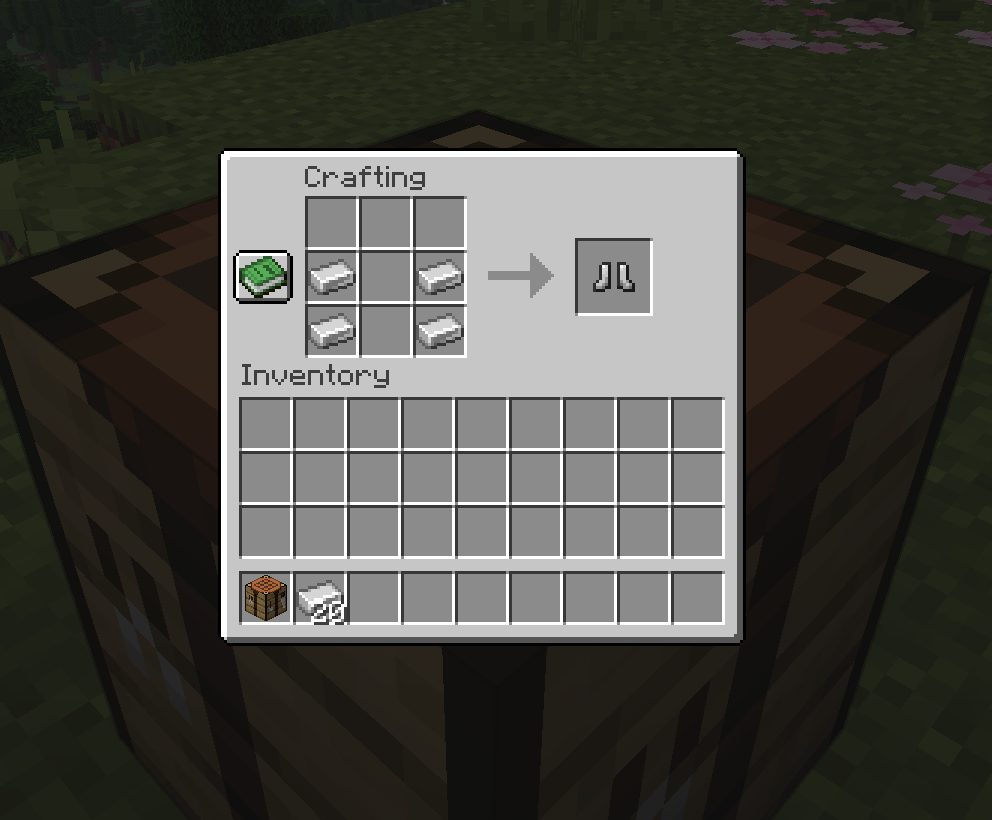
Boots require only four units of material. Fill the bottom-left and middle-left slots, then repeat the same on the bottom-right and middle-right slots. This leaves the entire centre column empty and creates your boots.
Equipping a full set of armour significantly boosts your chances of survival, filling up your armour bar. While you can mix and match armour types, a full set of one material offers better overall protection. Start with iron armour if possible, as it provides solid defence and is easier to obtain than diamond.
Remember, armour also has durability, meaning it wears down with each hit you take. Keep an eye on the armour’s condition bar, and craft replacements as needed.
Useful Utility Blocks and Items
Beyond tools and armour, Minecraft has several utility blocks essential for various tasks. As a beginner or intermediate player, knowing how to craft these blocks will significantly improve your survival experience:
Furnace
A furnace is essential for smelting ores into metals, such as turning iron ore into iron ingots, and cooking food. To craft a furnace, arrange 8 cobblestone blocks in the crafting grid's perimeter, leaving the centre empty. Place the furnace in your base, and you'll be able to smelt items using fuel sources like wood or coal. Furnaces are vital for obtaining advanced materials.
Chest
As you gather resources, you'll quickly run out of inventory space. A chest provides storage for 27 stacks of items. Craft it using 8 wood planks, filling all crafting grid slots except the centre.
Place the chest to store items, and for extra storage, craft another chest and position it next to the first one, creating a Large Chest with doubled capacity. Managing inventory effectively is crucial for your Minecraft adventures.
Bed
Beds allow you to sleep through the night, avoiding encounters with nocturnal mobs and setting a spawn point. Craft a bed by placing 3 wool blocks of the same colour in the top row of the crafting grid, with 3 wood planks directly below them. Wool can be gathered by shearing or killing sheep. Having a bed early on is highly recommended to stay safe and get to daylight quickly.
Torches
Torches are essential for lighting up caves, mines, and your base, preventing hostile mob spawns. To craft torches, place 1 coal or charcoal directly above 1 stick in your crafting grid, yielding 4 torches. Coal is mined from coal ore, while charcoal is made by smelting wood logs in a furnace.
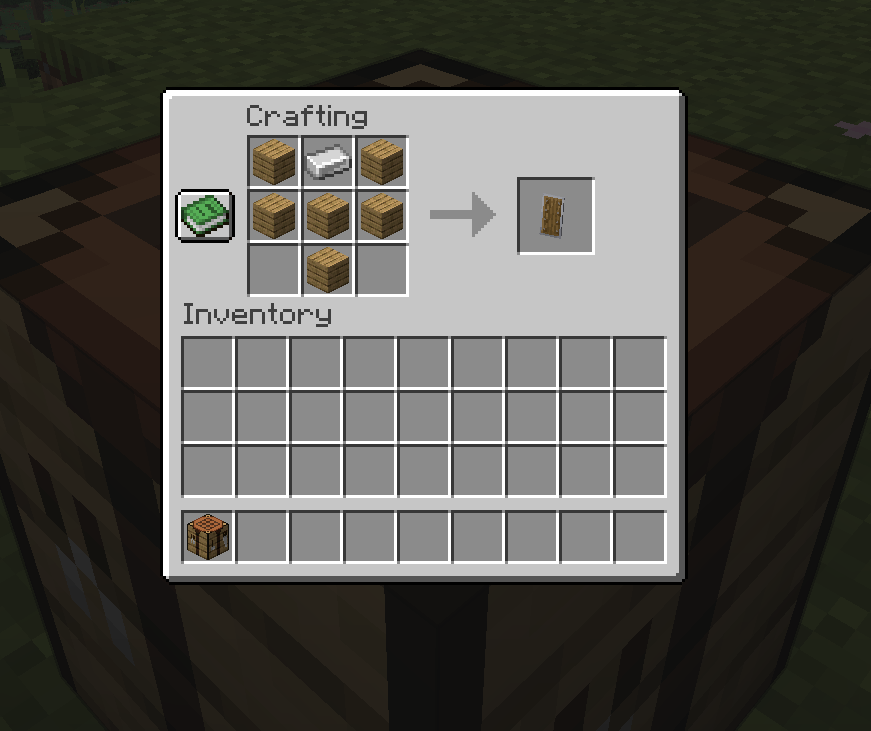
Door
A wooden door is a practical addition to any beginner shelter, providing safety from hostile mobs. Craft a door using 6 wood planks arranged in two vertical columns of three on the crafting table. This recipe yields 3 doors, making it perfect for expanding your base or multiple entries. Place doors at your shelter's entrance, ensuring convenience and security from mobs.
These utility items form the foundation of your Minecraft survival toolkit. With a furnace, chest, bed, torches, and door, you'll enhance your survival efficiency and safety.
Minecraft Hosting With Kinetic
At Kinetic, we’re pretty keen Minecraft players ourselves. That’s why we offer a range of Minecraft hosting services. Find out how we can support your gaming adventures, from reliable game servers to expert guidance. Discover our full range of servers designed to help you craft, build, and explore without limits.
Start Your Own Server
Looking for a game server? Get set up in a few moments. With our one-click installers and simple packages.
Related Posts
The Garden Awakens Drop
The Garden Awakens update for Minecraft 1.21.4 is now here! Featuring the Pale Garden with it's new Wood Types, Creaking mob, Resin block family and the Eyeblossoms! We will be covering everything within this Minecraft update so you can have the full scoop!
Cody1 December 2024
How Many Mobs Are in Minecraft? Full List
Discover every mob in Minecraft, from passive animals to bosses like the Ender Dragon and Warden. Learn how many mobs are in Minecraft today.
Fen21 October 2025
How Many Biomes Are There in Minecraft? Complete Guide
Discover all 64 Minecraft biomes across the Overworld, Nether, and End. Explore unique environments, mobs, and resources in this complete guide.
Fen1 September 2025

What Are Minecraft Plugins? (And How to Install Them on Your Server)
Running a Minecraft server isn’t just about keeping it online it’s about creating a great experience for your players. One of the best ways to do that is by using plugins to customize your server.
Chris19 August 2025
The Best Cobblemon Modpacks in 2026 Based on Playstyle
There are so many modpacks built around Cobblemon out there, and that list just continues to grow. Find out which is right for you based on your playstyle!
Dals15 July 2026

RAM, Minecraft, and Game Servers
One of the most common misconceptions we see with game servers, especially Minecraft, is that RAM is something you should try to save. In reality, servers will use RAM if it’s available, and that’s usually a good thing.
Chris4 January 2026